-
(MmDetection) VisionTransfomer 백본으로 학습해보기Mmdetection 2024. 10. 22. 22:31반응형
이번시간에는 VisionTransfomer (VIT) 백본을 사용하여 학습하는 방법에 대해서 알아볼 것이다.
즉, 모델은 faster-rcnn을 사용하지만 백본은 VIT을 사용할 것이다.
우선, VisionTransfomer는 mmdetection에서 기본으로 존재하는 백본이 아니다.
(Projects 폴더에 보면 visiontransfomer 백본 파일이 있긴 하지만 아직은 사용되는 것 같지가 않았다.)
그래서 mmpretrain에서 pretrained 된 VIT 백본을 다운받아서 해당 백본을 활용한다.
https://mmpretrain.readthedocs.io/en/latest/papers/vision_transformer.html
위 링크에서 여러 vit 백본들을 소개한다.
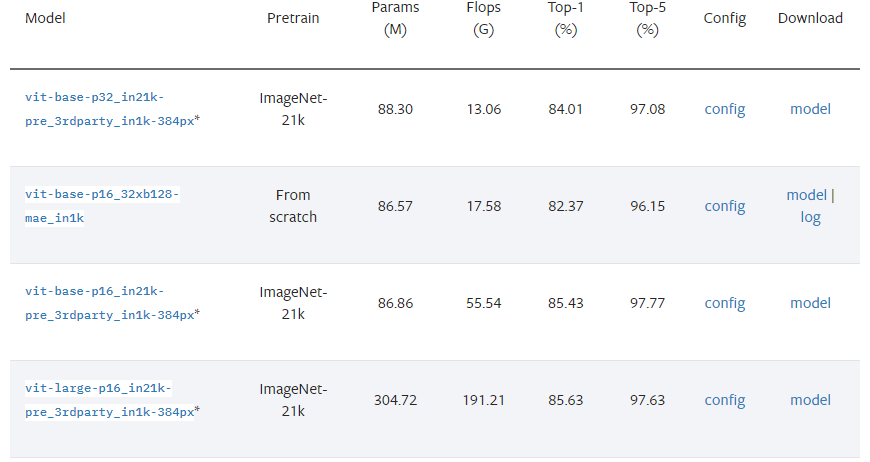
여기서 vit-base-p16_in21k-pre_3rdparty_in1k-384px의 백본을 사용할 것이다.
Download 칸의 model 버튼의 링크를 사용하고자 하는 서버의 wget 명령어로 붙여넣고 다운로드 받는다.
나같은 경우는 ~/mm_test/pretrained/폴더 안에 넣어놓았다.
이어서 mmpretrain을 다운받는다. pip install mmpretrain으로 다운 받을 수 있다.
이제 config파일을 작성한다.
custom_imports = dict(
    imports=['mmpretrain.models'],
    allow_failed_imports=False) # 오류가 나면 표기한다는 뜻

_base_ = [
    '/home/skku//mmdetection/configs/_base_/datasets/coco_detection.py',
    '/home/skku//mmdetection/configs/_base_/schedules/schedule_1x.py', '/home/skku//mmdetection/configs/_base_/default_runtime.py'
]
custom_import는 외부 모듈이나 패키지를 가져올수 있도록 해준다.
mmpretrain.models를 import하여 VIT 백본을 사용할 수 있도록 하고 있다.
이엇, _base_ 설정은 config에서 사용할 config파일들을 불러오는데 다음 파일들을 불러온다.
- COCO 데이터셋 형식의 기본 설정 가져오기
- 1x 스케줄(12 에폭) 학습 설정 가져오기
- 기본 런타임 설정 가져오기
꼭 불러올 필요는 없으나 코드의 중복을 피하기 위해서는 불러오는게 좋다.
상속의 개념을 이해한다면 이해가 갈것이다.
# 데이터셋 설정
data_root = "/home/skku/mm_test/data/cargox/"
metainfo = {
    "classes": ("knife1-1", "knife1-2", "knife2-1", "knife2-2", "knife3-1", "knife3-2", "knife4-1", "knife4-2"),
    "palette": [
        (225, 0, 0), (0, 0, 255), (0, 255, 0), (255, 255, 0),
        (0, 255, 255), (255, 0, 255), (255, 165, 0), (0, 0, 128),
    ]
}
위 부분은 데이터셋을 설정하는 부분이다.
나는 cargox라는 데이터셋을 사용하고 그에 맞는 메타 정보를 입력한다.
메타 정보는 데이터셋의 특징, 구조를 명시하는 변수이다.
cargox 데이터셋은 xray에서 흉기를 찾는 데이터 셋이기 때문에 위와 같이 classes와 탐지했을시 bbox 색상에 대한 palette를 입력했다.
# 모델 설정
model = dict(
    type='FasterRCNN', #모델은 faster rcnn을 쓴다.
    data_preprocessor=dict( #pretrained된 vit백본이 imagenet으로 학습되어서 이에 맞게 데이터를 전처리하여 모델에 전달한다.
        type='DetDataPreprocessor',
        mean=[123.675, 116.28, 103.53],  # ImageNet 평균값
        std=[58.395, 57.12, 57.375],     # ImageNet 표준편차
        bgr_to_rgb=True,                 # OpenCV는 BGR, 모델은 RGB 사용
        pad_size_divisor=32)             # Feature map 생성을 위한 패딩
    backbone=dict(
        type='mmpretrain.VisionTransformer',
        arch='base',         # 'base' 구조 사용
        img_size=384,        # 입력 이미지 크기
        patch_size=16,       # 패치 크기
        out_indices=(2, 5, 8, 11),  # 출력할 레이어 인덱스
        drop_rate=0.0,       # dropout rate
        drop_path_rate=0.1,  # stochastic depth rate
        norm_cfg=dict(type='LN', eps=1e-6),  # Layer Normalization
        out_type='featmap',  # 출력 형식을 feature map으로
        with_cls_token=True, # class token 사용
        final_norm=True,     # 마지막 normalization 사용
        init_cfg=dict( #ImageNet으로 pretrain된 vit 백본을 쓴다.
            type='Pretrained',
            checkpoint='/home/skku/mm_test/pretrained/vit-base-p16_in21k-pre-3rdparty_ft-64xb64_in1k-384_20210928-98e8652b.pth'
        )
    ),
    neck=dict(
        type='FPN',
        in_channels=[768, 768, 768, 768],  # ViT에서 받는 특징 크기
        out_channels=256,                   # RPN과 ROI로 보낼 특징 크기
        num_outs=5                          # 만들 특징맵 개수
    ),
    rpn_head=dict(
        type='RPNHead',
        in_channels=256,
        feat_channels=256,
        anchor_generator=dict(
            type='AnchorGenerator',
            scales=[8],
            ratios=[0.5, 1.0, 2.0],
            strides=[4, 8, 16, 32, 64]
        ),
        bbox_coder=dict(
            type='DeltaXYWHBBoxCoder',
            target_means=[.0, .0, .0, .0],
            target_stds=[1.0, 1.0, 1.0, 1.0]
        ),
        loss_cls=dict(
            type='CrossEntropyLoss', use_sigmoid=True, loss_weight=1.0
        ),
        loss_bbox=dict(type='L1Loss', loss_weight=1.0)
    ),
    roi_head=dict(
        type='StandardRoIHead',
        bbox_roi_extractor=dict(
            type='SingleRoIExtractor',
            roi_layer=dict(type='RoIAlign', output_size=7, sampling_ratio=0),
            out_channels=256,
            featmap_strides=[4, 8, 16, 32]
        ),
        bbox_head=dict(
            type='Shared2FCBBoxHead',
            in_channels=256,
            fc_out_channels=1024,
            roi_feat_size=7,
            num_classes=8,
            bbox_coder=dict(
                type='DeltaXYWHBBoxCoder',
                target_means=[0., 0., 0., 0.],
                target_stds=[0.1, 0.1, 0.2, 0.2]
            ),
            reg_class_agnostic=False,
            loss_cls=dict(
                type='CrossEntropyLoss', use_sigmoid=False, loss_weight=1.0
            ),
            loss_bbox=dict(type='L1Loss', loss_weight=1.0)
        )
    ),
    train_cfg=dict(
        rpn=dict(
            assigner=dict(
                type='MaxIoUAssigner',
                pos_iou_thr=0.7,
                neg_iou_thr=0.3,
                min_pos_iou=0.3,
                match_low_quality=True,
                ignore_iof_thr=-1),
            sampler=dict(
                type='RandomSampler',
                num=256,
                pos_fraction=0.5,
                neg_pos_ub=-1,
                add_gt_as_proposals=False),
            allowed_border=-1,
            pos_weight=-1,
            debug=False),
        rpn_proposal=dict(
            nms_pre=2000,
            max_per_img=1000,
            nms=dict(type='nms', iou_threshold=0.7),
            min_bbox_size=0),
        rcnn=dict(
            assigner=dict(
                type='MaxIoUAssigner',
                pos_iou_thr=0.5,
                neg_iou_thr=0.5,
                min_pos_iou=0.5,
                match_low_quality=False,
                ignore_iof_thr=-1),
            sampler=dict(
                type='RandomSampler',
                num=512,
                pos_fraction=0.25,
                neg_pos_ub=-1,
                add_gt_as_proposals=True),
            pos_weight=-1,
            debug=False)),
    test_cfg=dict(
        rpn=dict(
            nms_pre=1000,
            max_per_img=1000,
            nms=dict(type='nms', iou_threshold=0.7),
            min_bbox_size=0),
        rcnn=dict(
            score_thr=0.05,
            nms=dict(type='nms', iou_threshold=0.5),
            max_per_img=100))
)
model 설정 부분인데 핵심이 되는 backbone 설정 부분을 설명하면 다음과 같다.
mmpretrain 에서 가져온 vit 백본은 여러 아키텍처가 존재한다.
(밑의 코드는 mmpretrain의 visiontransfomer.py를 참고함)arch_zoo = { # 'small' 구조 **dict.fromkeys(['s', 'small'], { 'embed_dims': 768, 'num_layers': 8, 'num_heads': 8, 'feedforward_channels': 768 * 3, }), # 'base' 구조 **dict.fromkeys(['b', 'base'], { 'embed_dims': 768, 'num_layers': 12, 'num_heads': 12, 'feedforward_channels': 3072 }), # 'large' 구조 **dict.fromkeys(['l', 'large'], { 'embed_dims': 1024, 'num_layers': 24, 'num_heads': 16, 'feedforward_channels': 4096 }), # 'huge' 구조 **dict.fromkeys(['h', 'huge'], { 'embed_dims': 1280, 'num_layers': 32, 'num_heads': 16, 'feedforward_channels': 5120 }), }여기서 base 구조를 사용했는데 base 구조는
- 768 차원의 hidden size
- 12개의 transformer 층
- 각 층마다 12개의 attention head 을 가지고 있다.
그러면 내가 설정한 VIT 백본의 전체적인 동작과정을 간략하게 설명하면.
1.백본에 384x384 크기의 이미지가 들어온다.
2.이를 16x16 형태로 잘게 자른다. (패치 생성)
3.잘린 패치들을 12단계로 분석하는데 이중 4단계(2,5,8,11)에서 특징을 추출한다.
단계가 올라갈수록 더욱더 고차원의 특징들을 추출한다. 예를들어 2단계에서는 칼날의 날카로운 부분, 5단계에서는 칼날의 형태 이후에는 전체적인 칼의 모양을 추출한다.
4.ImageNet에서 미리 학습한 지식을 통해 VIT가 CargoX의 이미지를 학습한다.
5.학습된 결과를 통해 특징맵을 추출해서 detector에게 전달한다.
백본의 전체적인 역할이다.
(전체적인 과정은 다음과 같다)
그러면 이제 vit가 추출한 특징을 fpn neck이 받아서 특징을 가공한다음 faster-rcnn의 rpn이 받아서 탐지할 객체가 존재할 것 같은 위치를 제안하고 이를 roi-head가 이어서 받아서 자세히 분석하여 물체를 특징 짓고 loss를 계산하여 이를 반복한다.
옵티마이저는
AdamW를 썼다 VIT에 적합한 옵티마이저 형식이기 때문
학습률은 0.00001로 느리게 학습하도록 설정하였다.
(전체 config)
# mmpretrain의 모델(ViT)을 사용하기 위한 import 설정
custom_imports = dict(
    imports=['mmpretrain.models'],
    allow_failed_imports=False)

# 기본 설정들을 가져옴
# - COCO 형식의 데이터셋 처리를 위한 기본 설정
# - 12 에폭 학습 스케줄 설정
# - 기본 런타임 설정
_base_ = [
    '/home/skku//mmdetection/configs/_base_/datasets/coco_detection.py',
    '/home/skku//mmdetection/configs/_base_/schedules/schedule_1x.py',
    '/home/skku//mmdetection/configs/_base_/default_runtime.py'
]

# 데이터셋 설정
# - data_root: 실제 데이터가 저장된 경로
# - classes: 검출할 8종류의 칼 클래스명
# - palette: 시각화 시 각 클래스별 색상 (R,G,B)
data_root = "/home/skku/mm_test/data/cargox/"
metainfo = {
    "classes": ("knife1-1", "knife1-2", "knife2-1", "knife2-2",
               "knife3-1", "knife3-2", "knife4-1", "knife4-2"),
    "palette": [
        (225, 0, 0), (0, 0, 255), (0, 255, 0), (255, 255, 0),
        (0, 255, 255), (255, 0, 255), (255, 165, 0), (0, 0, 128),
    ]
}

# 전체 모델 구조 설정
model = dict(
    # Faster R-CNN 타입 설정
    type='FasterRCNN',

    # 데이터 전처리 설정
    # - mean, std: ImageNet 데이터셋의 평균과 표준편차 (정규화에 사용)
    # - bgr_to_rgb: OpenCV(BGR)와 모델(RGB) 간의 색상 채널 변환
    # - pad_size_divisor: 패딩 크기를 32의 배수로 맞춤
    data_preprocessor=dict(
        type='DetDataPreprocessor',
        mean=[123.675, 116.28, 103.53],
        std=[58.395, 57.12, 57.375],
        bgr_to_rgb=True,
        pad_size_divisor=32),

    # ViT 백본 설정 (특징 추출기)
    backbone=dict(
        type='mmpretrain.VisionTransformer',
        arch='base',         # base 모델 (768차원, 12층, 12 헤드)
        img_size=384,        # ViT 입력 이미지 크기
        patch_size=16,       # 16x16 크기로 이미지 패치 분할
        out_indices=(2, 5, 8, 11),  # 특징을 추출할 레이어 인덱스
        drop_rate=0.0,       # 일반 드롭아웃 비율
        drop_path_rate=0.1,  # 확률적 깊이 드롭아웃 비율
        norm_cfg=dict(type='LN', eps=1e-6),  # Layer Normalization
        out_type='featmap',  # 출력을 특징맵 형태로
        with_cls_token=True, # 분류 토큰 사용
        final_norm=True,     # 마지막 레이어 정규화 사용
        init_cfg=dict(       # ImageNet 사전학습 모델 사용
            type='Pretrained',
            checkpoint='/home/skku/mm_test/pretrained/vit-base-p16_in21k-pre-3rdparty_ft-64xb64_in1k-384_20210928-98e8652b.pth'
        )
    ),

    # FPN (Feature Pyramid Network) 설정
    # - 백본의 특징들을 다양한 크기의 특징맵으로 변환
    neck=dict(
        type='FPN',
        in_channels=[768, 768, 768, 768],  # ViT에서 나오는 특징 차원
        out_channels=256,                   # FPN 출력 특징 차원
        num_outs=5                          # 출력할 특징맵 개수
    ),

    # RPN (Region Proposal Network) 설정
    # - 물체가 있을 만한 영역을 제안
    rpn_head=dict(
        type='RPNHead',
        in_channels=256,      # FPN에서 받는 특징 차원
        feat_channels=256,    # RPN 내부 특징 차원
        # 앵커(기본 박스) 생성 설정
        anchor_generator=dict(
            type='AnchorGenerator',
            scales=[8],                     # 앵커 크기
            ratios=[0.5, 1.0, 2.0],        # 앵커 비율
            strides=[4, 8, 16, 32, 64]     # 특징맵 간격
        ),
        # 바운딩 박스 인코딩/디코딩 설정
        bbox_coder=dict(
            type='DeltaXYWHBBoxCoder',
            target_means=[.0, .0, .0, .0],
            target_stds=[1.0, 1.0, 1.0, 1.0]
        ),
        # RPN 손실 함수 설정
        loss_cls=dict(
            type='CrossEntropyLoss', use_sigmoid=True, loss_weight=1.0
        ),
        loss_bbox=dict(type='L1Loss', loss_weight=1.0)
    ),

    # ROI Head 설정 (최종 검출기)
    roi_head=dict(
        type='StandardRoIHead',
        # ROI 특징 추출기 설정
        bbox_roi_extractor=dict(
            type='SingleRoIExtractor',
            roi_layer=dict(type='RoIAlign', output_size=7, sampling_ratio=0),
            out_channels=256,
            featmap_strides=[4, 8, 16, 32]
        ),
        # 바운딩 박스 헤드 설정
        bbox_head=dict(
            type='Shared2FCBBoxHead',
            in_channels=256,
            fc_out_channels=1024,
            roi_feat_size=7,
            num_classes=8,  # 검출할 칼 클래스 수
            bbox_coder=dict(
                type='DeltaXYWHBBoxCoder',
                target_means=[0., 0., 0., 0.],
                target_stds=[0.1, 0.1, 0.2, 0.2]
            ),
            reg_class_agnostic=False,
            # ROI Head 손실 함수 설정
            loss_cls=dict(
                type='CrossEntropyLoss', use_sigmoid=False, loss_weight=1.0
            ),
            loss_bbox=dict(type='L1Loss', loss_weight=1.0)
        )
    ),

    # 학습 관련 설정
    train_cfg=dict(
        # RPN 학습 설정
        rpn=dict(
            # positive/negative 샘플 할당자
            assigner=dict(
                type='MaxIoUAssigner',
                pos_iou_thr=0.7,    # positive 샘플 IoU 임계값
                neg_iou_thr=0.3,    # negative 샘플 IoU 임계값
                min_pos_iou=0.3,
                match_low_quality=True,
                ignore_iof_thr=-1),
            # 샘플 선택기
            sampler=dict(
                type='RandomSampler',
                num=256,            # 총 샘플 수
                pos_fraction=0.5,   # positive 샘플 비율
                neg_pos_ub=-1,
                add_gt_as_proposals=False),
            allowed_border=-1,
            pos_weight=-1,
            debug=False),
        # RPN 제안 설정
        rpn_proposal=dict(
            nms_pre=2000,          # NMS 전 후보 수
            max_per_img=1000,      # 이미지당 최대 제안 수
            nms=dict(type='nms', iou_threshold=0.7),
            min_bbox_size=0),
        # RCNN 학습 설정
        rcnn=dict(
            assigner=dict(
                type='MaxIoUAssigner',
                pos_iou_thr=0.5,
                neg_iou_thr=0.5,
                min_pos_iou=0.5,
                match_low_quality=False,
                ignore_iof_thr=-1),
            sampler=dict(
                type='RandomSampler',
                num=512,
                pos_fraction=0.25,
                neg_pos_ub=-1,
                add_gt_as_proposals=True),
            pos_weight=-1,
            debug=False)),

    # 테스트 설정
    test_cfg=dict(
        rpn=dict(
            nms_pre=1000,
            max_per_img=1000,
            nms=dict(type='nms', iou_threshold=0.7),
            min_bbox_size=0),
        rcnn=dict(
            score_thr=0.05,        # 검출 점수 임계값
            nms=dict(type='nms', iou_threshold=0.5),
            max_per_img=100))      # 이미지당 최대 검출 수
)

# 데이터 파이프라인 설정
# 학습용 파이프라인
train_pipeline = [
    dict(type='LoadImageFromFile'),              # 이미지 파일 로드
    dict(type='LoadAnnotations', with_bbox=True), # 바운딩 박스 정보 로드
    dict(type='Resize', scale=(1333, 800), keep_ratio=True),  # 이미지 크기 조정
    dict(type='RandomFlip', prob=0.5),           # 50% 확률로 좌우 반전
    dict(type='PackDetInputs')                   # 모델 입력 형식으로 패킹
]

# 테스트용 파이프라인
test_pipeline = [
    dict(type='LoadImageFromFile'),
    dict(type='Resize', scale=(1333, 800), keep_ratio=True),
    dict(type='LoadAnnotations', with_bbox=True),
    dict(
        type='PackDetInputs',
        meta_keys=('img_id', 'img_path', 'ori_shape', 'img_shape', 'scale_factor')
    )
]

# 데이터 로더 설정
# 학습용 데이터 로더
train_dataloader = dict(
    batch_size=2,                # 배치 크기
    num_workers=2,               # 데이터 로딩 프로세스 수
    persistent_workers=True,     # 워커 유지
    sampler=dict(type='DefaultSampler', shuffle=True),  # 데이터 셔플
    batch_sampler=dict(type='AspectRatioBatchSampler'),  # 배치 샘플러
    dataset=dict(                # 데이터셋 설정
        type='CocoDataset',      # COCO 형식 데이터셋
        data_root=data_root,     # 데이터 경로
        metainfo=metainfo,       # 클래스 정보
        ann_file='annotations/train.json',  # 어노테이션 파일
        data_prefix=dict(img='train/'),     # 이미지 경로
        filter_cfg=dict(filter_empty_gt=True, min_size=32),  # 필터링 설정
        pipeline=train_pipeline                              # 데이터 파이프라인
    )
)

# 검증용 데이터 로더
val_dataloader = dict(
    batch_size=1,
    num_workers=2,
    persistent_workers=True,
    drop_last=False,
    sampler=dict(type='DefaultSampler', shuffle=False),
    dataset=dict(
        type='CocoDataset',
        data_root=data_root,
        metainfo=metainfo,
        ann_file='annotations/val.json',
        data_prefix=dict(img='val/'),
        test_mode=True,
        pipeline=test_pipeline
    )
)

# 테스트용 데이터 로더는 검증용과 동일
test_dataloader = val_dataloader

# 평가 설정
val_evaluator = dict(
    type='CocoMetric',          # COCO 평가 지표 사용
    ann_file=data_root + 'annotations/val.json',  # 평가용 어노테이션
    metric='bbox',              # 바운딩 박스 평가
    format_only=False)
test_evaluator = val_evaluator

# 학습 루프 설정
train_cfg = dict(type='EpochBasedTrainLoop', max_epochs=12, val_interval=1)  # 12 에폭 학습
val_cfg = dict(type='ValLoop')    # 검증 루프
test_cfg = dict(type='TestLoop')  # 테스트 루프

# 학습률 스케줄러 설정
param_scheduler = [
    # 처음 500 iteration 동안 선형적으로 학습률 증가
    dict(
        type='LinearLR', start_factor=0.001, by_epoch=False, begin=0, end=500),
    # 8, 11 에폭에서 학습률 감소
    dict(
        type='MultiStepLR',
        begin=0,
        end=12,
        by_epoch=True,
        milestones=[8, 11],
        gamma=0.1)
]

# 옵티마이저 설정
optim_wrapper = dict(
    _delete_=True,  # 기존 설정 삭제
    type='OptimWrapper',
    optimizer=dict(type='AdamW', lr=0.0001, weight_decay=0.05),  # AdamW 옵티마이저
    clip_grad=dict(max_norm=1.0, norm_type=2)  # 그래디언트 클리핑
)

# 기본 훅 설정
default_hooks = dict(
    timer=dict(type='IterTimerHook'),
    logger=dict(type='LoggerHook', interval=50),
    param_scheduler=dict(type='ParamSchedulerHook'),
    checkpoint=dict(type='CheckpointHook', interval=1),
    sampler_seed=dict(type='DistSamplerSeedHook'),
    visualization=dict(type='DetVisualizationHook'))

# 환경 설정
env_cfg = dict(
    cudnn_benchmark=False,
    mp_cfg=dict(mp_start_method='fork', opencv_num_threads=0),
    dist_cfg=dict(backend='nccl'),
)

# 로그 레벨 설정
log_level = 'INFO'
load_from = None
resume = False
이후 python이 mmpretrain의 위치를 알 수 있도록 사용할 터미널 세션에서 다음 명령어를 입력한다.
export PYTHONPATH=$PYTHONPATH:/home/skku/anaconda3/envs/openmmlab/lib/python3.8/site-packages/mmpretrain이렇게 되면 python이 mmpretrain의 정확한 위치를 파악할수 있다.
이제 train.py나 dist_train.py로 학습을 할 수 있다.
본인이 원한다면 세세한 설정들을 바꿔가면서 학습을 커스터마이즈 해도 된다.
반응형'Mmdetection' 카테고리의 다른 글
(MmDetection) 훈련 성능 지표 확인하는 법 (6) 2024.10.18 (mmdetection) 커스텀 데이터셋 훈련하기 (9) 2024.10.09 (MmDetection) 중단된 훈련을 이어서 진행하는 방법 (3) 2024.10.07 MmDetection demo.jpg 인퍼런스해보기 (2) 2024.10.02 Linux환경에서 Mmdetection2.X 버전 설치방법 (6) 2024.10.02